Showing posts with label canning. Show all posts

Sunday, August 30, 2015

Winding Down the Canning Season.....

I really never stop canning.  I make soups and stews and can dried beans all year round, but the busy canning season is in the summer and it is winding down.

I canned the last of the butternut squash two weekends ago and that rounded out a very bountiful harvest! 


 God has blessed us with such a wonderful garden this year and I have no words to express my thanks.  Pretty much every weekend for the last 6 weeks or so has been devoted to canning all of that largesse!

This is the breakdown of this years bounty.....


  • 53 pints salsa  (Most of these tomatoes were bought from our Amish neighbors - 24 lbs for $8)
  • 5 pints pizza sauce
  • 31 pints sweet corn
  • 19 quarts lime pickles
  • 19 quarts dill spears
  • 2 pints dill spears
  • 29 quarts butternut squash
  • 2 quarts mixed corn and squash
  • 15 quarts tomatoes
  • 7 pints sweet relish
  • 7 pints bread and butter pickles
  • 12 pints zesty bread and butter pickles
  • 6 pints mulberry jam
  • 9 pints summer squash
  • 4 pints pickled beets
  • 22 pints green beans
  • 57 lbs of red potatoes
Next year we plan to plant a lot more summer squash and only one hill of cucumbers and one hill of butternut squash.  We should have plenty of pickles and butternut squash left over.  If not then we'll revise the plan.  

The garden has been tilled in preparation for the fall crops of kale, turnips, beets (for greens), green onions, and mustard greens.  I've found that beet greens are just about my favorite type of green, so I can't wait for those to come up!

These fellers were oh so happy to get the canning leavings and I'm oh so glad to share with them, as it makes for such delicious pork!  They are getting all the leftovers from canning as well as lots of surplus eggs and milk and as you can see it they are doing well!


In front here is the big gilt, or Peggy Sue as we call her.  She is a BEAUTIFUL hog and I would keep her for breeding, but she'll serve us much better in the freezer.


The little red spotted gilt is Rita Rose.  I actually bought her to use as a breeding sow, but she isn't maturing near as nice as I'd like to see her, so she will go into the freezer as well.  The barrow is in the middle.  He's not as nice as Peggy Sue either, but will make delicious meat nonetheless!


So that's whats going on around here.  Things are good, summer is quickly fading into fall and we are so happy and blessed!

Till next time,

God Bless,


Saturday, July 18, 2015

Memories of Lime Pickles.....

God has blessed us this year with a most bountiful garden!  

We've been canning corn, squash, green beans and making salsa.  We've dug the onions and have them hanging on the back porch, and have been digging taters here and there.  We won't dig all of them until the cukes and squash are done as the vines have spread so, they are covering the spuds up!

This post is about pickles though and we've made dill spears, zesty bread and butter chunks, and bread and butter chips, but best of all we've made Lime Pickles.

These are the pickle of my childhood.  They are my favorite pickle.  Potato salad isn't potato salad without chunks of lime pickle in it, and a hamburger just doesn't taste the same without them, but the best of the best is lime pickles diced up in your bowl of chili, or wait is it lime pickles on a peanut butter sandwich?  I don't know but I know lime pickles are fantastic!

I have heard these called "outhouse pickles" or even the ever so classy "sh!thouse pickles", but we always just call them lime pickles.

So you start with some of these.....about 7 lbs (although I did a double batch)


Seeing as how I work 40 hours a week, Mon-Fri, I only really pick cukes on Saturday morning, which means I've got cukes the size of zucchini!!  With all the rain we've been getting though, they aren't bitter, so we still use 'em...

Then you need pickling lime......


Slice your cucumbers up, slightly on the thick side....


And then put them in a big ole lidded container.  If you have a pickle crock, use that.  I do not, so I use a food grade plastic bucket.  We soak them in 2 cups of lime per 2 gallon of water.....


......With the lid on, for 24 hours.  

I always put the bucket in the bathtub, so when I shake it around every few hours it doesn't make a mess......


The next morning, you drain the lime water off, and rinse your cukes really well.  3 times, until your water is clear.....


Then you put them back in your clean bucket and cover them with ice water and let them set for 3 hours.....


Then you drain the ice water off, and mix up your brine as follows...

2 qts vinegar, 6 1/2 cups sugar, 1 TBSP cloves, 1 TBSP salt, 1 TBSP celery seed, 1 TBSP pickling spice.

Bring that to a boil and then pour over the cukes in your bucket.  I then weigh the cukes down with a plate before putting the lid on the bucket and leaving them again for 24 hours.


By this time it's now day 3, and time to process your pickles!  However, in my world it is now Monday afternoon and I'm at work, soooo what's a Goodwife to do?

I just waited until Tuesday morning before work to process mine.  That made them soak in the brine closer to 36 hours but that's ok.  No harm done.  I just got up at 3:30 am and did them before work.....


Now you bring the whole mess to a boil and simmer for 35 minutes.  


Then you put your hot pickles in hot jars, and fill with hot brine.  Wipe your rims and put rings and flats on as usual, and process quarts in boiling water bath canner for 15 min and you wind up with this...


I hope you are all well and good and enjoying God's rich bounty!  As the world gets crazier and scarier and more unsettled we are comforted knowing that we are God's children, and rejoicing in His wondrous gifts, blessings, and love!  I pray you are doing the same!

Till next time,

God Bless......

Sunday, February 15, 2015

Canning Turtle...........Or Snapping Turtle is Food Too!

Umm...excuse me?  Did she just say canning TURTLE?

Yup I sure did!  We love to fish for catfish, and where we live, when you love to fish for catfish, you usually catch a few catfish and a whole lot of snapping turtles.

But that is totally ok, because turtle is DELISH!

So pretty much every fishing trip we come home with some of these...


And some of these......

Please do excuse my attire....I would NEVER go out in public in this state of affairs, and probably shouldn't be putting a photo on my blog.....
So how in the world do you reduce a snapping turtle to food you ask?  

The first, FIRST thing you do is make sure it's a regular old snapping turtle and not an alligator snapping turtle.  Regular ones are legal to take here where we live but Alligator Snappers are protected and shouldn't be harvested for any reason!

First thing you do is put the turtle in a tub (nice and deep and with a cover over it because they WILL climb out of things that you cannot imagine they could ever get out of.

We usually keep them in the tubs, in the shade, changing the water every day, from one weekend to the next.  We also put them one turtle to a tub because they will fight.....we've had them get each other bloody in the boat bottom together, so you really don't want to put them in a tub together for a week!

Then you fill the tub with enough clean water to cover the turtle.....

This is a snapping turtle in the bottom of a trash toter....the big ones that they give you from the trash company....it's a REALLY big turtle...
Then you change the water every day.  This is how you "clean out" a turtle.

The water will get disgusting.  I mean.....for real.....super gross, which is why you do it.  You want the turtle to be as clean as he can be when you process him.

Then we process them.  Processing a turtle isn't for the faint of heart, but it is pretty quick and not that difficult.  We hang them up and skin them, and then cut the meat away from the shell.  There is some really delicious meat up between the spine and the shell, the turtle "back strap" if you will.  We slice that and fry it up fresh, but the rest of the meat gets soaked in salt water, and then de-boned.  Then I either can it right up, or freeze it to can later.

We also don't let the shell go to waste.  The Man totally cleans the shell, skull, and claws.  He then seals them with a coating of shellac and then we sell them or give them away.

This isn't the best picture of the turtle shells, but it's the only one I can find!
Lest you think we've been doing a lot of fishing, we haven't.  This de-boned turtle meat has been resting in my freezer until I had time to can it.  I got it out of the freezer last night and after a wonderful, uplifting church service today, I'm canning it up!

So the first thing you do is put your de-boned turtle in a stock pot and cover with water.

Bring it to a boil and boil for about 10 min or so....

Then pack your hot turtle meat loosely in a wide mouth quart jar, and top with your hot cooking liquid.  You can add 1 tsp of pickling salt if you'd like.

Wipe the rim clean and do all the good stuff you are supposed to do when you can, then put on a simmered flat and ring, and process for 90 minutes at whatever weight your altitude calls for (11#'s where I'm at).

Then you take them out and wait for the "ping"!


And that's how you can turtle!

What do we do with that canned turtle you ask?

Well stay tuned for a blog post entitled...

Hot Turtle Bites Served Hot

To find out!

Until next time............as the preacher said today......Grow and Glow in the Lord!!


Friday, March 11, 2011

Pinto Beans, Sandwich Baggies, and Soap...........

Yesterday I did some more cannin'.  Pinto beans with chipotle chili seasoning this time.........


While they were in the canner I decided to try my hand at making these cotton sandwich bags.  To my great surprise The Man said he would use them if they would keep his sandwich fresh.  I've had a slice of bread in it all day and it isn't looking good, but I do have a plan that I'll blog about soon.  I've also got some chips in one to see if they get stale.  This is what mine look like and they were ridiculously easy to whip up, taking like less than 2 minutes!


I love this fabric!  I bought quite a bit of it to make cloth napkins out of.  It's a lovely homespun....


And here you can see the little chipies in there.  I really love these bags and hope my idea will solve the freshness problem.  I've been packing The Man's lunch every day for 15 years and I'd love to stop using sandwich baggies!

Then I made a batch of basic soap.  Since The Youngun and I are both using my homemade shampoo, I needed to get more soap made.  I'll use this basic bar to mill with goat's milk and to grate and melt for shampoo and liquid soap. 

It' so funny because as I was looking up the links for this post, the last time I made soap I canned beans as well!

Have a wonderful weekend and I'll leave you with this picture.


This beautiful Barred Owl and his companions serenade us every evening and early morning with their mating calls.  It's beautiful!  Click to see it bigger......

and don't forget to check out....


God Bless.....................


Thursday, March 10, 2011

More Cannin', Beef Stew...............

Yesterday I decided to can some beef stew.  I'm trying to can up a bunch of quick meal type stuff so that this spring and summer when I'm too busy to cook, we'll still be eatin' good. 

Now there are folks out there who will tell you you can't can certain stuff.  I'm all about safety but I feel that as long as you research canning times for each item in your concoction and you process your jars for the length of time required of the longest item (good grief, does that make any sense?), you'll be ok.  That said, get a good canning book and follow those rules!!

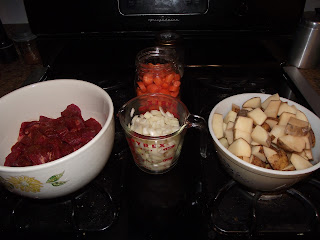
About 2 1/2 lbs of cut up beef, 2 cups diced onion, 1 quart cut up carrots, 2 qts diced 'taters......


Season the beef, then brown in a bit of lard in a stock pot.......


Dump your 'taters, carrots and onions in there and stir.....


Then add in a quart or so of tomato juice.  I used a quart of V-8 that I'd canned a couple years ago, and if it isn't soupy enough add in some water.  Also season well with your favorite seasonings.  I used celery seed, salt, and black pepper.  Then heat to just to boiling.........


As soon as your stew is boiling, you can it up!  Process in a pressure canner for 75 minutes at 11 lbs pressure and you have this.......


Can't wait to try it!

When you can soups or stews they can't be very thick or they might not get heated all the way through and might not be safe to eat.  When I heat this stew if I want it thickened I'll just thicken it up with some cornstarch or flour.


God Bless................


Monday, March 7, 2011

Catfish Chowder, Ala the Goodwife..........

Every spring and summer our clan heads to the lake to fish.  What do we fish for?  Catfish of course!  Channel cats or mud cats, we don't care, we love 'em all.  Actually I prefer the taste of mud cat, or maybe you call them yellow bellies?  Anywho, there is no size limit on mud cats because folks usually consider them a pest fish, like bluegill (which we enjoy as well). 

As I was makin' my Aldi list on Sunday I found three gallon bags full of itty bitty mud cats.  I was wondering what I could do with them and thought of clam chowder.  I have a recipe for cannin' New England style clam chowder and thought I could probably whip somethin' up, so I got started!

First I put my witty bitty frozen mud cats in my pressure pan and seasoned them up good.....


Fish takes no time to cook in a pressure cooker.  Once you get the steam up and put the jiggler on, it only takes about 10 minutes or less, so while that was cookin' I got the rest of my stuff ready to go!

1/2 lb of bacon..........


2 cups diced onions.........


About 4 quarts or so of peeled 'taters.......


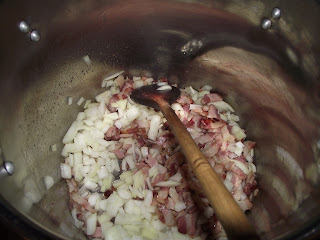
Saute the bacon until it's slightly brown, then add in the onions and saute.......


Dump your 'taters in there and add some seasonings, I used dill, salt, pepper, and some celery seed....

Now while your bacon was cooking and your onions were sauteing you should have been boning that catfish.  Here's a little secret........when you pressure cook catfish, the bones do the same thing salmon bones do.  Yup, they get "soft" so you don't have to pick through it too much.  Pick out most of the bones but if you miss some it's ok because you can eat them. 

Cooked catfish..........

After you get all your catfish mushed up and the bones out, you add that to your pot of bacon, 'taters, and onions.  Then you strain the broth to get out any loose bones and add the broth to your pot along with some water if need be.  How much?  Heck I don't know, this is the Goodwife you are talkin' to....you just add enough!  ;0)  No really, you add enough to make a soup, as you shouldn't can really thick stew.  It should be a nice consistency, not too watery and not super thick either. 

You also musn't can this in anything bigger than a pint.  I used half-pints for single servings and then did some in pints for more than one.

 Once it's in the canners..........


You process it for an hour and 40 minutes at 11 lbs pressure and whalllaaaa.....


You've got Goodwife Farm's Catfish Chowder!

To serve you dump your chowder in a pan, add in some milk and some butter and heat through, but don't boil.

Then you eat it up!


Quite yummy with some homemade bread and butter and a glass of tea!


God Bless...................

Monday, January 10, 2011

Veggie Soup..........with Tree Rats!

This weekend was cold and clear.  On Saturday we went grocery shopping and after two heaping cart loads of groceries (thanks Aldi!) and loading the Challenger down so that she was squatting like a drag car we got home and unloaded and my cupboards are full to over flowing!

The Man went out to play with his Coronet (it's gutted again by the way, not a stitch of interior in it) and I set about making some vegetable soup.  I ate the last jar of my Rabbit Vegetable Soup last week, so making and canning some more was a must. 

Since we sold the rabbits, I've only got two left in the freezer and didn't want to use them for soup.  I'm saving them to make bbq bunny for The Youngun.  I did have two squirrells in the freezer so decided to pull them out to use in my soup.  I tossed them in my pressure cooker with some seasonings and set them to cookin'.  After about 35 minutes I'd gone from two frozen squirrels to a bowl of deboned meat.  I got my soup goin' on the stove, added the squirrel, and let it simmer while I ran out to do chores. 
Looks yummy no?
Then I proceeded to can it up. 
jars..........
Cannin' tools.........
Filled jars ready for cannin'
You can pretty much can anything together, as long as you process your jars for the length of time of the longest item.  I consulted my handy dandy canning book for processing times for each item in my soup.  Oddly enough the item that required the longest processing time was spinich, so I processed my jars according to the canning regs for spinich which happened to be 70 minutes for pints at 11# pressure.  You have to really watch your canner and keep adjusting your heat to maintain the pressure and not get so hot your canner kersplodes.  What was I doing while watching my canners you ask?

I was sitting in front of the stove knitting of course!

So after a few hours work, I wound up with 16 pints of yummy homemade veggie soup!  Nothing better on a cold day that a hot bowl of homemade soup and a smammich!


Hope you had a nice weekend as well!


God Bless...........................